
Get Prepared!
Roller blinds are such a versatile product and a breeze to install. Unpack your boxes and remove the outer plastic wrapping. Look out for the label affixed to the soft foam wrapping on your roller blind, which shows your product name & the basic roller blind specs. Be sure to keep the soft foam wrapping attached to the roller blind until you install the roller blind into the brackets.
Have a read of our helpful installation guide so you can confidently install your new roller blinds.
What you need:
✓ 1 to 2 people
✓ A tape measure
✓ A pen or pencil
✓ A Drill, if you don’t have one, call your handyman Bhaiya
✓ Step Ladder if the window is high
Time you need:
✓ 5-10 mins
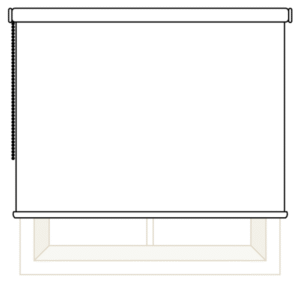
Fit Type: Three types
✓ Recess Fit – Inside Frame
✓ Face Fit – Outside Frame
✓ Frameless – No Frame
✓ Face Fit – Outside Frame
Face Fit
Installing your roller blind onto your window frame You’ll be installing the roller blinds brackets on the outside of your window frame. The brackets have multiple fixing points; however, to achieve maximum coverage, ensure to install the screws through the bracket onto the side of your window.
It only takes a few minutes to install your new roller blinds, so let’s get started.
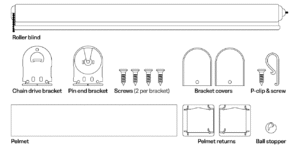
What’s in the box?
Let’s unpack everything! Lay it on the floor.
Open up the cardboard box(es) you’ve received. Open the outer layer of plastic surrounding your roller blind(s). You’ll notice some bracket componentry, beaded chains, end caps and a bag of screws. There’ll be one bag with all the screws for each of the blinds you’ve ordered – there are 4 screws per roller blind (2 per bracket).
*NOTE: Because your roller blind is fully customised, the components in your order may differ from those pictured here. Rest assured, we are always there to help and support you.
Mark up – Get a pencil ready
You’re going to be marking up where your brackets will be installed. Also, if you ordered an optional pelmet, you’ll be marking up the pelmet brackets too.

Mark up your brackets
Gather your two brackets, the chain side bracket has a tongue for the chain drive to be inserted, the pin end bracket has a small hole. Lift each bracket to the top of your window frame with each bracket pointing out, on the outside corners of your window frame.
Make two marks, one on each end of the bracket as shown in the image. Make sure the back of the bracket is at least 10mm from any obstructions below, that your blind could get snagged on.
If you have a pelmet, mark up your brackets
Optional (if you have a pelmet) – Slide your brackets into the pelmet returns before marking up. As they need to be installed as one piece. Like the previous step, lift each bracket to the top of your window frame with each bracket pointing out, on the outside corners of your window frame. Make two marks, one on each end of the bracket.
Install your brackets
Let’s get drilling – Now you’ll be drilling pilot holes for your brackets and then installing them with the supplied screws.
Don’t have a drill at home? No worries!
You can always call your trusted local carpenter, electrician, or plumber — they usually carry a drill and can help you install the brackets in no time. It’s a small job they’ll wrap up quickly and affordably.
Now, let’s get those brackets up!
Once the drill is ready, start by making pilot holes where your brackets will go. Then, secure them firmly using the supplied screws.
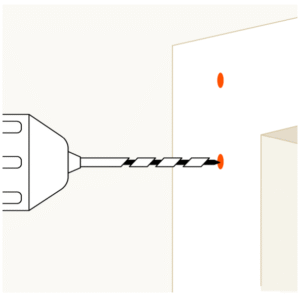
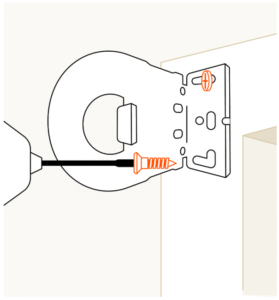
Drill your pilot holes
Pop the 3mm drill bit into your drill and pre-drill two holes for each of the roller blind brackets where you’ve marked in the previous step. Repeat for both brackets.
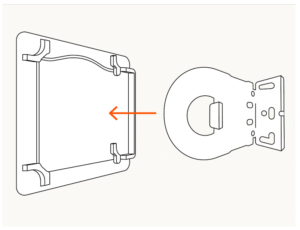
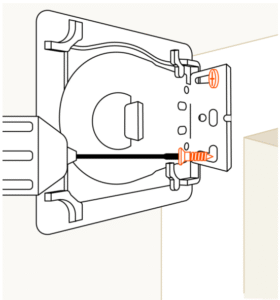
Install your roller blind brackets
Grab your chain end bracket first, as shown in the image above, and install using two supplied screws. Be sure to double-check which side the chain is on your order for each blind and install the chain end bracket on that side.
Repeat this process for the pin end bracket on the other side of the window frame.
If you have a pelmet, install the pelmet brackets
Optional (if you have a pelmet) – Install the pelmet return and brackets together, with the supplied screws.
Are you ready to install your blind? Told you, it was an easy-peasy installation!
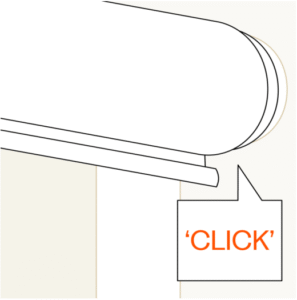
Click in your roller blind, it’s that easy!
You’re nearly there. Simply click your roller blind into your already installed brackets. Pay close attention to the chain drive end as you’ll need to ensure the “hood” of the chain drive is pointing to 12 o’clock.
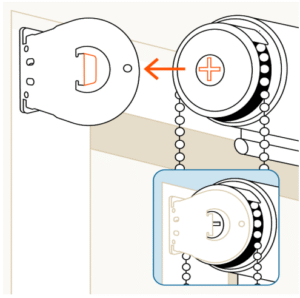
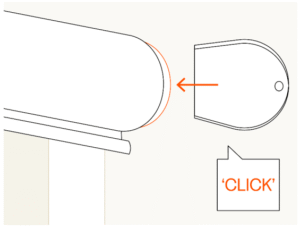
Insert the roller blind into the chain drive bracket
Pick up your roller blind and line up the chain drive end with the chain side bracket. Align the tongue of the bracket with the inserts on the chain end of the blind and make sure the top or “hood” of the chain end is pointed to 12 o’clock.
Tip: If the chain component doesn’t align properly, remove the soft foam wrapping from the blind and let some of the fabric roll so you can align it perfectly.
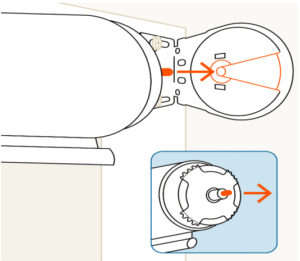
Insert the roller blind into the pin end bracket
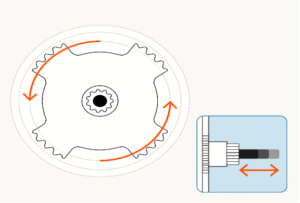
Guide the pin end of the roller blind into the pin end bracket. You’ll see a channel on the bracket to slide the blind into the hole. If the pin end component isn’t extended, simply turn the clear plastic cog, and the pin will extend out from the component.
Depress the metal pin into the component until the blind is level with the pin hole.
Click in your blind
You’ll hear a satisfying ‘click’ when the pin end has slotted successfully into the pin end bracket.
Your new roller blind is installed! If the blind is feeling a little loose, follow the next step to extend the pin end further.
Not a perfect fit?
If your roller blind is a bit loose for your liking
Don’t worry, our genius pin end roller blind component can extend up to 15mm, so your blind can always fit perfectly.
Simply twist the clear plastic cog surrounding the pin end component. Twist until you feel resistance, and the cog will settle at the current extension point and a perfect finish.
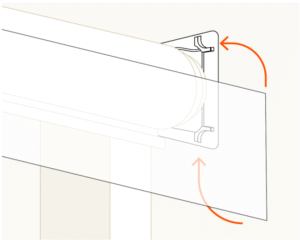
Slide on your bracket covers
This bit is really easy, line up your bracket cover with your bracket and gently clip it into place on the outside of your brackets.
If you don’t have a pelmet – you’re done and we’re proud of you!
Optional: Attach your pelmet
If you have a pelmet, let’s pop that on.
Position the pelmet in the groove of the pelmet return bracket, at the top on both sides. Apply a small amount of force to the bottom of the pelmet and allow it to clip into the bottom of the bracket. Your pelmet should sit flush to the frame, and the roller blind will roll nicely.
You’ve done it!
Congratulations!
Well done on installing your new roller blind – it’s easy-peasy, right?
If you have more roller blinds in your order, it’ll be much easier the second time! Thanks for reading along, and here at DIY Custom Blinds, we hope you enjoy your new roller blind.